5/09/2010

MISSING THE LINK

...

I have been some time offline, very busy and without enough time to upgrade my blog. But during the night I have found some minutes to publish an article about how to paint rusty links. The method is very laborious, but very simple. Although the final result worth the effort. Thanks to all you. I hope you like it.

_________________________________________________


He estado algún tiempo desconectado, muy ocupado y sin tiempo suficiente para actualizar mi blog. Pero durante la noche he encontrado unos minutos para publicar un artículo sobre cómo pintar eslabones oxidados. El método es muy laborioso, pero muy sencillo. Aunque el resultado final merece el esfuerzo. Gracias a todos vosotros. Espero que os guste.


Use different Tamiya colors to paint each link.

Utiliza diferentes colores de tamiya para pintar cada eslabon.


With a sponge an the Dust And Rust set colors from LIFECOLOR, we will make some kind of chipping effects as you can see below.

Con una esponja y el set de LIFECOLOR Dust and Rust, pintaremos los primeros efectos de desconchones en la superficie como puedes ver en las fotos de abajo.


Also, with the same variete of colors we will apply some rust washes.

También, con la misma variedad de colores aplicaremos unos lavados de óxido.

To create a variety of shades, we will paint in faded green some links, like remains of old green color when the tank was painted with green camoflage.

Para crear más variedad de tonos, pintaremos en verde claro algunos eslabones, como restos de verde antiguo cuando el tanque fue pintado en camuflaje verde.

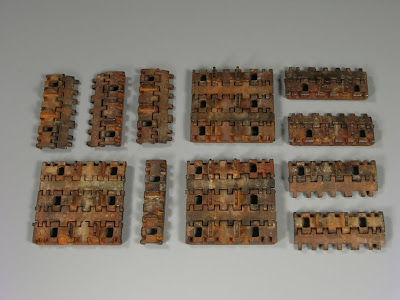
Now we will add the pigments. In the left (below), you can see links without pigments. Right ones with pigments.

Ahora añadiremos los pigmentos. In la izquierda, debajo, podeis ver eslabones sin pigmentos y en la izquierda con pigmentos.

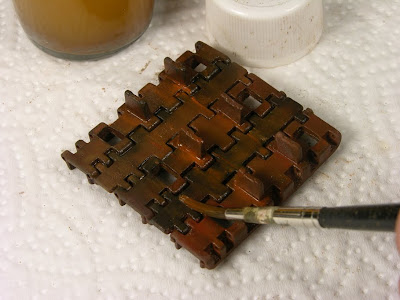
Add randomly different rust colors with a brush...

Aplica de manera aleatoria diversos colors de óxido...

And then...damp them with a drop of turpentine.

Y después humedecelos con unas gotas de aguarrás.

In some links, we will paint dark areas with enamel colors as you can see in the picture below.

En algunos eslabones, podemos pintar zonas oscuras coin colores esmales como puedes observar debajo.

Now, add dust and light rust pigments again.This is the dusting phase. And as before damp them with clean turpentine in a way to fix the pigments.

Ahora, añade colores de polvo y óxido claro de pigmento otra vez. Esta es la fase de empolvado. Igual que antes, humedece la superficie con aguarras limpio para fijarlos.
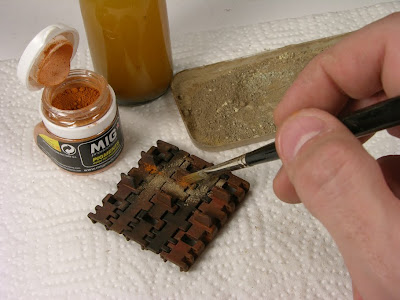


Finally, we wil repeat the sponge chipping, but this time using very dark brown-rust colors.

Finalmente, repetiremos los desconchones de esponja, pero esta vez usando colores marron oxido muy oscuro.
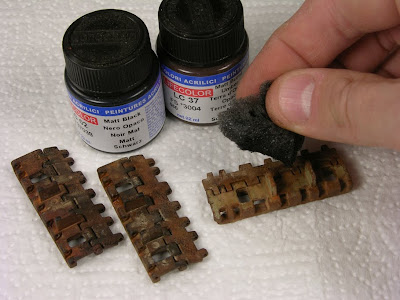


The spare links used is in 1/16th scale, but you can apply the same technique in smaller scales with no problem. I think that the look is enought nice to decorate our tanks.

Los eslabones usados son en escala 1/16, pero puedes aplicar la misma tecnica en escalas más pequeñas sin problemas. Creo que el aspecto final es suficientemente atractivo para decorar nuestros tanques.


Thanks for take your time reding this.

Gracias por leer este articulo.


MIG

3/23/2010

1/24 Tasca PzII, KURKS

...

Recently I have finished a new scale model. Although seemingly the aspect belongs to a normal model, with its weathering and effects, I should say that this Panzer supposed a very big challenge for my, because this was painted using acrylic paintings exclusively. You can believe that it is simple, but when you want to make stumped effects, fading or oxide stains, the task is very complicated. How to get that aspect so special that only the enamels or the oil can offer? For me it was a different project that never before had made it. And I should say that it is necessary to change the steps completely and to create a new order for the washes, chips, fading, etc.. But I think that this is a good alternative for many people that cannot work with enamels. It doesn't neither exist the strong scent to paint thinner.

I made this project for Vallejo ACrylics Company that has been the base for the creation of a new DVD that will be for sale soon.

__________________________________________________

Recientemente he terminado una nueva maqueta. Aunque aparentemente el aspecto es de un modelo normal, con su envejecido y efectos, debo decir que este Panzer supuso un reto muy grande para mi, porque fue pintado utilizando exclusivamente pinturas acrilicas. Podeis creer que es sencillo, pero cuando quieres hacer efectos de difuminados, desgastes o manchas de óxido, la tarea es muy complicada. ¿Cómo conseguir ese aspecto tan especial que sólo los esmaltes o el óleo puede ofrecer? Para mí fue un proyecto diferente, que nunca antes lo había hecho. Debo decir que es necesario cambiar completamente los pasos y crear un nuevo orden para los lavados, desconchones, desgastes, etc..

Pero pienso que esto es una buena alternativa para muchos personas que no pueden trabajar con esmaltes. No existe tampoco el fuerte olor a aguarrás.


Filters, washes, fading, mud, rust, chips, metal effects, dust, etc...wwere made using only Vallejo Acrylic products.


Even decal applicators is acrilic based from Vallejo.

Water colors, Vallejo Acrylic washes, retarders and glazes was used during the process.

The DVD will be for sale in 1 month or 1 month and a half, and is available in English narration with spanish captions. This volume cover all areas of AFV modelling, from the base color to the last touches. I hope you like it.
Thanks
Mig Jimenez
....

3/04/2010

YOM KIPPUR T62 NEW BOOK

...

Finally a book has been published specifically about Yom Kippur War based on the T62. Although this book gathers all the aspects of the T62 and its variants, the main thematic is based on the use of the T62 under the Syrian and Egyptian army, during the Yom Kippur War. In my opinion, the Yom Kippur war was the battle where it was used the T62 and the T55 in more quantity. And of course this battle was the second bigger confrontation of tanks after the battle of Kurks. Also, the T62 was in that time of 1973, the best Soviet tank. Unfortunately, the Arab generals didn't know how to take out profit of this superiority and they lost the war. But inside the context of the modelling, the T62 is without a doubt a very interesting model to apply all type of camouflages. This new Robert Manasherob's book is indispensable for the new Trumpeter kit.

This great book contains blue prints of all the versions, original pictures of 1973 in the Sinai and in Golan, pictures of several T62 in museums and profiles with different camouflage versions. But it also contains several pictures in color of several destroyed T62. For followers of the Arab wars, this book is an inexhaustible source of ideas and inspiration, and the value of the unpublished pictures is incalculable. So it is moment of beginning my own T62. I no longer have excuses and I hope to be able to make the T62 OOB.
_____________________________________________

Finalmente se ha publicado un libro especificamente sobre la guerra del Yom Kippur basado en el T62. Aunque este libro reune todos los aspectos del T62 y sus variantes, la principal temática está centrada en la utilización del T62 en el ejército Sirio y Egipcio, durante el Yom Kippur. En mi opinión, la guerra del Yom Kippur fue la batalla donde se utilizó el T62 y el T55 en mayor cantidad. Y por supuesto esta batalla fue la segunda mayor confrontación de tanques despues de la batalla de Kurks. Además, el T62 era en aquella epoca de 1973, era el mejor tanque sovietico. Por desgracia, los generales arabes no supieron sacar provecho de esta superioridad y perdieron la guerra. Pero dentro del contexto del modelismo, el T62 es sin duda un modelo muy interesante para aplicar todo tipo de camuflajes. Este nuevo libro de Robert Manasherob es imprescindible para el nuevo kit de Trumpeter.

Este gran libro contiene planos de todas las versiones, fotos originales de 1973 en el Sinai y en Golan, fotografias de varios T62 en museos y perfiles con distintas versiones de camuflaje. Pero tambien contiene varias fotografias en color de varios T62 destruidos. Para seguidores de las guerras arabes, este libro es una fuente inagotable de ideas e inspiración, y el valor de las fotografias ineditas es incalculable. Asi que es momento de comenzar mi propio T62. Ya no tengo excusas y espero poder hacer el T62 de caja.


I reccomend you to buy this book in his own web page.
Te recomiendo comprar este libro en la propia página del autor:


http://www.sabingamartin.com/


Thank you Robert for this great book. My dream come true.


Mig Jimenez


...

2/24/2010

JSU-152?

...

Once again, my friend Nobuo from Tamiya, sent me kindly the last kit: JSU152.
Only opening the box you can "smell" the quality of the pieces and the detail. Is necessary admit that Tamiya Team overcomes everything with each new model. Although some pieces of the kit are same ones than in the previous JSII, the new parts are extraordinarily fine and well modeled. But the great difference of the JSU152 with the JSII is that the first one can be located in Yom Kippur war or in "The six days war." And of course this it is the reason for which I should make reference to this kit. From now on I will go adding in this blog all the vehicles and information that I can find about Yom Kippur War and the participant vehicles. By now, until I get some accessories, I leave you here pictures of the JSU152 in the Museum of Volgograd (Stalingrad) that I photographed some years ago. I hope you like it!
_______________

Una vez más, mi amigo Nobuo from Tamiya, me envió amablemente el último kit de la marca: JSU152. Solamente abriendo la caja puedes oler la calidad de las piezas y el detalle. Hay que admitir que Tamiya superan todo lo anterior con cada nuevo modelo. A pesar de que algunas piezas del kit son iguales que en el anterior JSII, las nuevas partes son extraordinariamente finas y bien moldeadas. Pero la gran diferencia del JSU152 con el JSII es que el primero puede ubicarse en Yom Kippur o en "la guerra de los seis dias". Y por supuesto esta es la razon por la que debo hacer referencia a este kit. Desde ahora iré añadiendo en este blog todos los vehiculos e información que pueda acerca de Yom Kippur y los vehículos participantes. De momento , hasta que consiga algunos accesorios, aqui os dejo fotos del JSU152 en el Museo de Volgograd (Stalingrad), que fotografié hace algunos años.

(The next model was made by my friend Shigeito Takeuchi)


Photos from Volgograd Museum:


Thanks for looking!!
Mig Jimenez
...

2/02/2010

WINTER TIME, 1/16th TAMIYA KVII

...

The winter subjects is one of my passions. I really like white vehicles because offer me a large range of possibilities about weathering or effects. You can paint a winter vehicle with dry dust or mud or very fresh one. You can apply a faded whitewash or a very clean white. You can make very evideny chips or scratches, rust or grease, and all kind of dirt or effects. In this case, with my last winter KVII, I wanted create a very worn or faded winter camo, result of a prolonged period of battles. Maybe this KV is going to the the Spring. The sun and the rain entried in action and the winter color is coming inapropiated. This is what I mede under this concept. I hope you like the result:


The technique used for this case is a complex combination of hairspray technique, oils fading, chips by brush and much more. Everything covered by a coat of dirt, rust and dust.


Is important create a combinations of "more dirt areas" and more white ones, in a way to keep a random look and make it more interesting and real. Avoid do the same in the whole model.

The same with green and white areas. Is important make a good contrast between very faded green areas and new white ones.

Tool box chipped with hairspray technique and covered with dust.

See how there are very dusty areas close to clean ones. This is important to give volume to the model.


For first time, I added a big cuantity of leaves and vegetation over the fenders, like I have seen in many pictures. In fact, is hard to find a picture with very clean mudguards. Obdserv how the dirt is acumulated in the corners.

WINTER MODELS
I wanted collect all my preview winter vehicles in this page, in a way to see the paint evolution. The next ones is an example of some of my old models which was a good source to get experience to paint the KVII in 1/16th scale. Some of them is really old, but I feel proud because in that time was good enought.


And that's all folks. Now I need a couple of day of vacations after paint the KVII. It was really hard because it should be finsihed for Nuremberg toy fair 2010. Fortunatly, I was on time and the Tamiya staff will be able to show it in their stand!
Thanks, Nobuo Yoshioka.
...